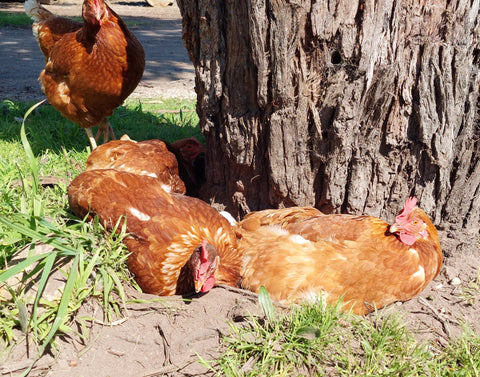
If you are a chicken owner, you will likely have seen your hens digging a hole in the ground and rolling around in it, attempting to get as much dirt under their feathers as possible. You might have wondered what on earth they are doing and why. Well, the answer is simple: They’re taking a dust bath!
Dust baths are not only a fun activity for chickens but also play a vital part in their hygiene and health. In this blog post, I’ll explain the benefits of dust baths, the best ingredients to use and how to create an effective one for your flock.
The Benefits of Dust Baths
Dust baths are a natural way for chickens to keep their feathers and skin clean and free of parasites. When chickens take a dust bath, they dig, roll, and toss dirt over their bodies, working the particles into their feathers and skin. This helps them remove excess oil, dirt, and dead skin cells, as well as helps dislodge any external parasites such as mites and lice that might be on them.
Dust baths also have a social and psychological function for chickens. They are a way for chickens to bond with each other as they often join in when they see other hens dust bathing. They also help chickens relax and reduce stress as they enjoy the sensation of the sun and the dirt on their bodies.
The Best Ingredients for a Dust Bath
A key ingredient for a good dust bath is sand. Sand has a fine texture that can easily penetrate the feathers and skin of chickens and it also absorbs moisture and oil. However, sand alone is not enough to create a good dust bath. You should also add other ingredients to enhance the effectiveness and the aroma of the dust bath. Here are some suggestions:
- Soil: Adds organic matter and minerals to the dust bath and also helps the sand stick to the chickens’ bodies.
- Wood ash and charcoal: Are great to add as they have anti-parasitic and anti-bacterial properties. They also provide some vitamin K, calcium and magnesium for your chickens. Make sure to use wood ash and charcoal that are free of inclusions such as nails, chemicals or fire lighters which can all be harmful to your chickens.
- Wood shavings: These add a carbon source to absorb moisture from any chicken manure done by the hens while enjoying their dust bath. Wood shavings should be dust-extracted and made from non-treated soft woods.
- Dry herbs: Add some fragrance and flavour to the dust bath as well as some health benefits. Some of the best herbs to use are lavender, wormwood, rosemary, mint, thyme and ginger. These herbs have anti-inflammatory, anti-fungal and anti-septic properties, and they can also repel insects and rodents.
- Bugs Away: A product that contains diatomaceous earth, a natural insecticide that kills parasites by dehydrating them through desiccation. After initially adding Bugs Away, it’s a good idea to periodically add a sprinkle each month or so to boost the effectiveness of your dust bath.
How to Make a Dust Bath for Your Chickens
Making a dust bath for your chickens is easy and inexpensive. All you need is a suitable container, a dry place to put it and the ingredients we mentioned above. Here are the steps to follow:
- Find a container that is large enough to accommodate several chickens at once. Ideally, it should have a diameter of at least 60 cm and a depth of about 20 cm. You can use an old toddler’s sandpit, a plastic tub, a wooden box, old tyre or anything else that can hold or contain the dust bath material.
- Choose a spot that is well sheltered from rain and wind as you want to keep the dust bath dry and comfortable for your hens to use. You can place it under a roof, a tree, tarp, inside a shed or ideally, inside your coop or run. If you have a good-sized run for your flock and don’t let them free range much, it’s important that you keep your dust bath inside the run or coop. Avoid placing it in direct sunlight as it can make the dust bath too hot and uncomfortable for your chickens to use in the summer.
- Fill your dust bath container to a depth of at least 10 cm with each of your chosen ingredients, mixing them well. You can use any proportions that you like but a good rule of thumb is to use 40% sand, 20% soil, 20% wood shavings, 10% wood ash and charcoal, 5% dry herbs and 5% Bugs Away.
- Place the dust bath in your chosen spot and let your chickens enjoy it. You can also add some toys such as balls, bells etc to make it more fun and stimulating for them.
How to Maintain a Dust Bath for Your Chickens
A dust bath doesn’t require a lot of maintenance but you should still check it regularly and keep it clean and fresh. Here are three tips to follow:
- Scoop out any droppings, feathers, or debris that might accumulate in the dust bath as they can build up over time to make it dirty and smelly. You can use a small rake or litter scoop for this.
- Top up the ingredients as they become depleted and always remove wet material.
- Replace the contents of the dust bath entirely at least every six months, or more often if needed. You can dispose of the old dirt in your compost pile or garden, as it can enrich the soil and deter pests.
I hope this blog post helps you understand the importance of dust baths for your chickens and how to make one for them. If you have any questions or feedback, please let me know. I’m always happy to help you with any questions.


Comments (9)
Thank you so much. I am a Ugandan farmer based in Kampala.
The write up has helped me understand the importance of wood ash to chickens. And specifically the value of fast bath in keeping the flock clean and hygiene.
Hi Jason, do you know where in Australia I can buy Wood ash and charcoal that is suitable for the dust baths? I don’t bbq. Thankyou.
Part of my very large chicken coop is over the old pool site, so is a sand base area and the chickens bath here.
I rake the area 2 or 3 times a week but do I need to clean or add more sand etc to this area.
Thank you, so very helpful. I made up a new dust bath today using your suggested mix.
Firstly, thank you very much Jeff and Donna for your comments and kind words which are appreciated!
In answer to the questions from John and Virginia – a more coarse sand works well but remember that it is only one component in a good mixture so don’t forget the dirt, wood shavings, wood ash and Bugs Away or diatomaceous earth.
Silkies aren’t the best climbers (or thinkers!), so I would use a low, ladder-type perch placed on a 45-degree angle. Depending on how many birds you have, I would have at least two perches between 400 and 600mm wide with the bottom rung around 150 from the ground and the second rung 150mm above it. The width of the perch should be at least 30mm with bevelled edges which will then provide a comfortable perch for the 5-toed Silkies.
What type of sand can be used for the dust bath
good job Jason your the best chook advisor ever and ever will be
I have raised chooks free range in York WA for ten years & now live in Yarloop WA on a smaller block where our 3 chooks have to be in a pen for awhile, until we can get the area finished off. So they have a shed 2.4 X 3 m X 2.1 high, a composting area of about the same, sheeted with colourbond around the bottom 1.2 high (fox proofed) cemented floor in both (as per our council regulations). I knew chooks loved to have sand baths but I have learnt now what mix to do for the girls I have in the shed. So we can now prepare one in the shed for them. Thank you so much for the valuable information. Kind Regards Donna
Can you please tell the best way for making a roost for silkie chickens? Thank you.